Improving Your Home Studio Experience
Your audio interface is like the wizard behind the scenes in your home studio, making your music sound amazing. This guide will help you understand, choose, and make the most of the best audio interface for your setup. Let’s explore the details of audio interfaces, check out some top choices, and learn the essential tricks for better performance.
Understanding Your Home Studio Gear
An audio interface is not just a regular gadget; think of it as the magical tool that turns your everyday sounds into something extraordinary in your home studio. It works like a sound magician, turning basic noise into a high-quality recording. To really get what it does, let’s break down what an audio interface is and uncover how important it is for making your recordings sound awesome.
Demystifying the Audio Interface:
Beyond a Simple Device
At its essence, an audio interface is an external hardware unit that acts as an intermediary between your instruments, microphones, and the digital world of your computer. Serving as the bridge between analog and digital domains, it ensures that the subtleties of your sound are accurately captured and translated into the digital realm.
- Signal Translation: When you sing into a microphone or strum a guitar, you create analog signals – continuous variations in voltage. The audio interface takes these analog signals and translates them into digital data that your computer can understand and process. This translation is fundamental to preserving the integrity of your sound.
- Precision in Conversion: The quality of this translation, often measured in bit depth and sample rate, determines how faithfully the digital representation mirrors the original analog signal. Higher bit depths and sample rates contribute to a more nuanced and accurate reproduction of your sound.
Playing a Big Role in Making Things Sound Great: Crafting Awesome Sound
Now, let’s get into how important an audio interface is in making your recordings sound awesome:
Boosting Sound Quality: With special boosters called preamps, audio interfaces make your microphone or instrument sounds stronger before turning them into digital signals. This helps capture all the small details and special parts of your performance really well.
Getting Rid of Unwanted Noise: A good audio interface is built to stop unwanted sounds from messing up your recordings. It makes sure your recordings are clear and don’t have any annoying hissing or humming sounds. This is super important, especially when you’re recording at home where outside noises can be a bit of a problem.
Instant Feedback: Thanks to quality audio interfaces, you can hear yourself or your instruments in real-time without any annoying delays. This keeps your performance sounding natural and smooth, making it easier for you to get into the groove
Now, let’s talk about how important an audio interface is in making your recordings sound better:
- Boosting Sound Quality: With special boosters called preamps, audio interfaces make your microphone or instrument sounds stronger before turning them into digital signals. This helps capture all the small details and special parts of your performance really well.
- Getting Rid of Unwanted Noise: A good audio interface is built to stop unwanted sounds from messing up your recordings. It makes sure your recordings are clear and don’t have any annoying hissing or humming sounds. This is super important, especially when you’re recording at home where outside noises can be a bit of a problem.
- Instant Feedback: Thanks to quality audio interfaces, you can hear yourself or your instruments in real-time without any annoying delays. This keeps your performance sounding natural and smooth, making it easier for you to get into the groove.
.
Beyond Connectivity:
A Symphony of Possibilities
While providing connections between your regular gear and computer is the main job, an audio interface does even more:
- Multi-Channel Recording: Many audio interfaces have lots of input channels, so you can record many things at once. This is great for capturing live performances, recording different parts of a song separately, or making complex music.
- Versatility in Connectivity: Besides microphones and instruments, audio interfaces have various input and output options, including MIDI connections for electronic instruments and control surfaces. This means you can use all kinds of creative tools in your home studio.
From Analog to Digital conversion:
Bridging the Analog-Digital Divide
Audio interfaces play a big part in turning regular sounds into digital ones and vice versa. Regular sounds, like from microphones or instruments, are continuous waves. To use them on computers, they need to be changed into digital information, and that’s where analog-to-digital converters (ADC) come in. How well this is done affects how clear and true-to-life your recordings sound..
- Bit Depth: The number of bits in the ADC decides how detailed the digital sound is. More bits mean more details, giving a better copy of the original sound.
- Sample Rate: This tells us how many pieces of sound are taken per second. A higher sample rate helps the digital sound represent the original one more accurately, especially at higher pitches.
The Role of Preamps:
Shaping Your Sonic Canvas
Preamps, short for preamplifiers, are super important parts of audio interfaces. They make weak microphone or instrument signals stronger before turning them into digital sound. How good these preamps are makes a big difference in how your recordings sound.
- Gain Control: Preamps have controls to adjust how much they boost the sound. Getting this right is important to avoid distortion and make sure the sound is clean.
- Coloration: Some preamps add a special color or character to the sound. People often choose preamps based on the kind of sound they want, adding a unique flavor to their recordings.
Managing Latency:
Real-Time Responsiveness
LLatency is the delay between making a sound and hearing it back, which can be a problem in digital recording. While recording, especially when using software-based monitoring, too much delay can be distracting. Audio interfaces with low-latency monitoring can help with this.
- Direct Monitoring: This feature lets musicians hear their input directly, skipping the computer’s processing. It keeps things sounding natural and responsive, crucial for live tracking.
- Buffer Size: Changing the buffer size in your recording software can affect latency. Smaller buffers reduce delay but need more computer power, while larger ones increase delay but are easier on your computer.
The Heartbeat of Your Studio:
Choosing the Right Audio Interface
In short, how well an audio interface changes sounds from analog to digital, the quality of its preamps, and how it handles latency are super important. Picking the right interface for your recording needs makes sure your home studio sounds amazing. Whether you’re a singer capturing subtle details, a guitarist after clear tones, or a producer creating electronic sounds, the audio interface is like the heartbeat of your studio, turning your sonic dreams into a digital reality.
The Benefits of High-Quality Audio Interfaces
Having a really good audio interface isn’t just a fancy extra; it’s a must-have for anyone serious about making music at home. Let’s discover all the awesome benefits that come with investing in a top-notch audio interface. From making your music sound super clear to giving you more ways to connect, find out why a high-quality audio interface is like a magic key that unlocks pro-level recordings in your cozy home studio.

Top Contenders: The Best Audio Interfaces for Home Producers
Carefully Selected Excellence
In the huge world of audio interfaces, we’ve picked out a special list of the very best ones that suit different budgets. Check out a collection that mixes affordability with amazing performance. Each suggestion is looked at closely, weighing the good and not-so-good points to help you make a smart choice. Real people’s reviews and expert opinions give you a peek into what it’s really like for home music makers.
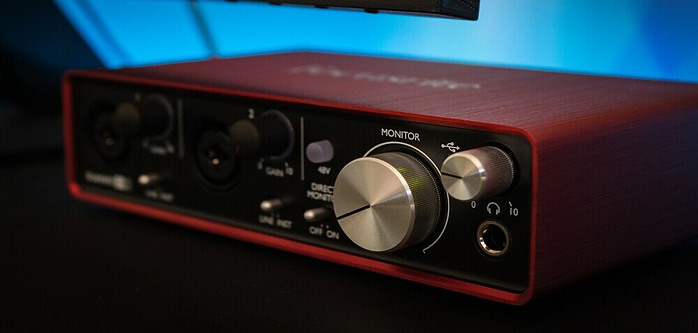
- Focusrite Scarlett 2i2 (3rd Gen):
- Pros: The Scarlett 2i2 is known for its high-quality preamps, providing clean and transparent audio. It has a solid build with a sleek red metal case. The USB-C connectivity ensures a fast and stable connection. The interface comes with a comprehensive software bundle, including Ableton Live Lite and Pro Tools First.
- Cons: While the Scarlett 2i2 is great for basic recording needs, it has a limited number of inputs and outputs, making it less suitable for larger studio setups.
- PreSonus AudioBox USB 96:
- Pros: The AudioBox USB 96 is an affordable and user-friendly option. It offers a durable build, making it suitable for portable setups. The inclusion of MIDI I/O is a bonus for those working with external MIDI gear. It comes with Studio One Artist software.
- Cons: The AudioBox USB 96 has a limited number of simultaneous inputs, which might be a drawback for more complex recording scenarios.
- Universal Audio Apollo Twin X Duo:
- Pros: The Apollo Twin X Duo is renowned for its exceptional audio quality and Unison preamp technology. It features UAD-2 DSP processing, allowing users to run high-quality plugins without taxing their computer’s CPU. The build quality is premium, and it comes with a variety of emulation plugins.
- Cons: The main downside is the higher price point compared to other entry-level interfaces.
- Audient iD4:
- Pros: The iD4 stands out for its high-performance preamp that delivers pristine audio. It has a compact and sturdy metal construction, making it suitable for both home studios and mobile setups. The unique ScrollControl feature provides an intuitive way to adjust settings.
- Cons: Similar to other compact interfaces, it has limited I/O, which may be a drawback for more extensive recording setups.
- MOTU M2:
- Pros: The M2 offers excellent audio quality with ESS Sabre32 DAC technology. It has a loopback feature, making it ideal for podcasters and streamers. The USB-C connectivity ensures high-speed data transfer. The interface is known for its low-latency performance.
- Cons: The software bundle is relatively basic compared to some other options.
- Steinberg UR22C:
- Pros: The UR22C boasts a robust build and impressive audio resolution at 32-bit/192 kHz. It includes MIDI I/O, catering to users working with MIDI instruments. The interface is known for its reliability and durability.
- Cons: Similar to other entry-level interfaces, it has limited simultaneous inputs.
- Behringer UMC22:
- Pros: The UMC22 is a budget-friendly option with a MIDAS preamp known for its clean sound. It has a rugged construction, making it suitable for various recording environments. The interface is straightforward and easy to use.
- Cons: It offers limited I/O options compared to higher-end models.
- RME Babyface Pro FS:
- Pros: The Babyface Pro FS is recognized for its premium sound quality and low-latency performance. It features a compact and portable design, making it suitable for on-the-go recording. The interface is well-regarded for its build quality and durability.
- Cons: The price is higher compared to other interfaces in the entry-level category, and it has limited I/O for users with more extensive recording needs.
- Arturia AudioFuse Studio:
- Pros: The AudioFuse Studio is a versatile interface with a wide range of I/O options, including ADAT expansion. It features high-quality preamps and a talkback feature, making it suitable for professional studio setups. The interface is known for its robust build and sleek design.
- Cons: The price point is higher compared to some other options.
- Tascam US-2×2:
- Pros: The US-2×2 is an affordable option with a solid build. It features MIDI I/O, which is beneficial for users working with MIDI instruments. The angled design provides easy access to controls, and it’s suitable for those on a budget.
- Cons: Similar to other entry-level interfaces, it has a limited number of simultaneous inputs.
- Native Instruments Komplete Audio 6:
-
-
- Highlights: This device is a powerhouse for music creation, offering four analog inputs and MIDI connectivity. It’s encased in a sturdy metal build and comes bundled with Komplete Start software.
- Considerations: Some users may find the control software less intuitive compared to alternative interfaces.PreSonus Studio 24c:
- Highlights: The Studio 24c packs quality XMAX-L preamps into a compact form, ensuring high-fidelity audio. Its USB-C connectivity enables swift data transfer, and it includes Studio One Artist software for a comprehensive music production experience.
- Considerations: Its limitation lies in the number of inputs, suitable for straightforward recording setups.
-
-
Setting Up Your Audio Interface for Great Performance
Unleashing Sonic Magic
Now that you’ve got the perfect audio interface, let’s make sure you get the most out of it. Follow a simple guide that walks you through setting up and adjusting things, making sure everything runs smoothly for awesome performance. We’ll also help you troubleshoot common problems that might pop up during the setup. Whether you’re recording your voice, instruments, or podcasts, learn the tricks to set things up just right for different recording situations.
Step-by-Step Guide: Installing and Configuring Your Audio Interface
Step 1: Unbox and Inspect
- Carefully unbox your audio interface and inspect it for any visible damage.
- Ensure that all necessary components, including cables and power adapters, are present.
Step 2: Connect to Power
- If your audio interface requires external power, connect it to a power source using the provided power adapter.
- Ensure that the power source is stable and reliable.
Step 3: Connect to Computer
- Use the appropriate USB, Thunderbolt, or Firewire cable to connect your audio interface to your computer.
- If your interface has multiple ports, select the one that corresponds to your computer’s capabilities.
Step 4: Install Drivers
- Check the manufacturer’s website for the latest drivers for your audio interface.
- Download and install the drivers following the provided instructions.
- Restart your computer if prompted.
Step 5: Configure Audio Settings on Your Computer
- Open your computer’s audio settings.
- Select the installed audio interface as the default input and output device.
- Adjust the sample rate and bit depth according to your preferences and project requirements.
Step 6: Test Connectivity
- Open your preferred Digital Audio Workstation (DAW) or recording software.
- Create a test project and ensure that your audio interface is recognized.
- Test the input and output by connecting a microphone or instrument.
Step 7: Set Up Monitoring
- Configure monitoring settings in your DAW to enable real-time monitoring through your audio interface.
- Adjust the mix between direct input monitoring and playback from your DAW.

Common Issues and Troubleshooting:
Issue 1: No Sound or Signal
- Check cable connections.
- Ensure proper driver installation.
- Verify that the correct input and output are selected in your DAW.
Issue 2: Latency
- Adjust the buffer size in your DAW settings. Smaller buffers reduce latency but may require more processing power.
- Activate low-latency monitoring on your audio interface if available.
Issue 3: Distorted Sound
- Check gain levels on your preamp. Avoid clipping by adjusting the gain appropriately.
- Ensure that your audio interface is set to the correct sample rate and bit depth.
Issue 4: Connectivity Problems
- Try different USB or Thunderbolt ports on your computer.
- Test the interface on another computer if possible.
Optimizing Settings for Diverse Recording Scenarios:
Scenario 1: Recording Vocals
- Use a high-quality microphone.
- Set up a pop filter to reduce plosive sounds.
- Optimize input gain for a clean signal without distortion.
Scenario 2: Recording Instruments
- Select the appropriate input for your instrument (e.g., line input for guitars).
- Experiment with microphone placement for acoustic instruments.
Scenario 3: Recording Podcasts
- Use a dedicated microphone for clear voice recording.
- Configure your DAW for multi-track recording to allow individual track editing.
By following these steps and addressing common issues, you’ll be well on your way to optimizing your audio interface for various recording scenarios. Happy recording!
Adapting to the Future: Making Your Home Studio Ready for Tomorrow
Tech Journey
In the always-changing world of technology, getting your home studio ready for the future is super important. Learn why thinking ahead when buying tech stuff is key and get tips on picking an audio interface that will stay useful as your needs change. Find out how to take care of your gear and upgrade it to make sure it keeps working well over time. Your home studio shouldn’t just keep pace with technology; it should lead the way in the sound revolution.

Conclusion: Starting Your Sonic Adventure
A Musical Symphony in Your Hands
As you dive into the world of audio interfaces for home studios, remember that it’s not just a gadget; it’s the conductor of your musical symphony. From grasping the basics to choosing the right interface for your needs, and making it work great for all kinds of recordings, your audio interface is like your musical sidekick. Enjoy the journey, keep up with new technologies, and let your home studio fill with the sounds of your creativity.
Conclusion: Starting Your Sonic Adventure A Musical Symphony in Your Hands
As you dive into the world of audio interfaces for home studios, remember that it’s not just a gadget; it’s the conductor of your musical symphony. From grasping the basics to choosing the right interface for your needs, and making it work great for all kinds of recordings, your audio interface is like your musical sidekick. Enjoy the journey, keep up with new technologies, and let your home studio fill with the sounds of your creativity.
Stay Connected for More Sonic Discoveries
Join us at Sonic Sound Lab for ongoing explorations through detailed articles, guides, and insights that empower you on your musical quest. May your audio interface open up endless musical possibilities, turning your home studio into the canvas where your musical journey unfolds. Happy recording!

